

Gable Vents for Wildfire-Prone Homes: Sizes, Styles & Ember Protection
A gable vent, sitting high on the wall of your home’s attic, is easy to overlook on a calm day. It blends into the roofline, doing its job while rarely demanding attention. But in a wildfire, that changes fast. What was an architectural detail becomes one of the home’s most exposed openings, and its high position puts it directly in the path of wind-driven embers traveling under sustained pressure. Most homeowners don’t think about their gable vents until fire season arrives, if at all. The ones who do are better prepared for what that season can bring.
That’s why understanding what gable vents do, what makes them vulnerable, and how engineered ember-resistant solutions like V2™ can actively protect your home matters so much to homeowners and builders in fire-prone areas.
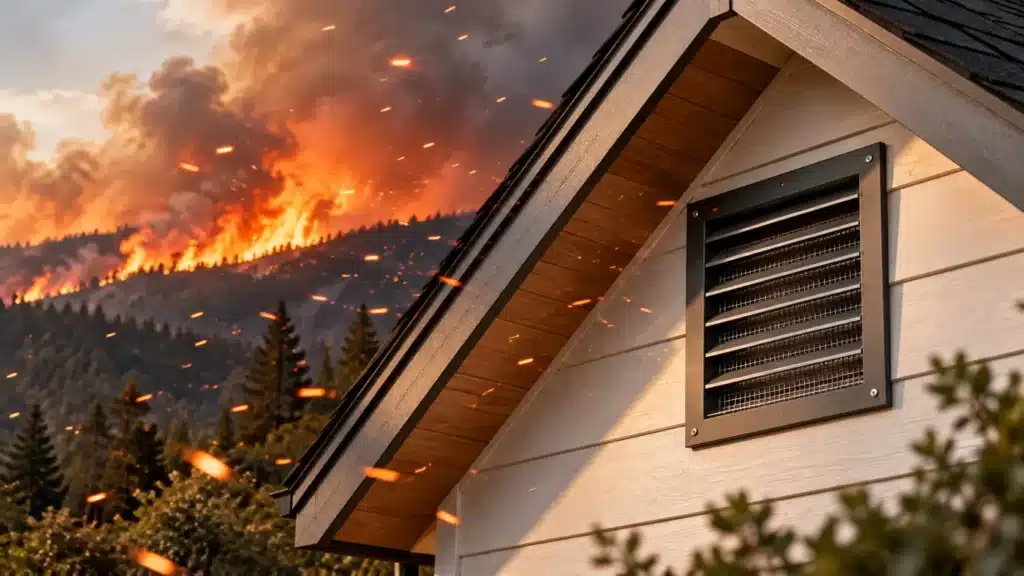
What Is a Gable Vent?
A gable vent is a ventilation opening installed in the gable end wall of a home, the triangular or peaked wall section at each end of a pitched roof, directly below the roofline peak. Unlike soffit vents, which are tucked beneath the roof overhang along the eave and function primarily as intake, gable vents are positioned high on the exterior wall where they’re visible and intended to be seen. They typically serve as exhaust openings, allowing hot air to exit at the highest point of the attic space.
That elevated position also makes them distinctive among vent types. Ridge vents run continuously along the roof peak and are largely invisible from the ground. Soffit vents are concealed beneath the overhang. Gable vents are deliberate architectural features, and in wildfire-prone areas, their visibility and height make them one of the first vent locations to address in a home hardening plan.
Gable Vent Sizes and Ventilation Requirements
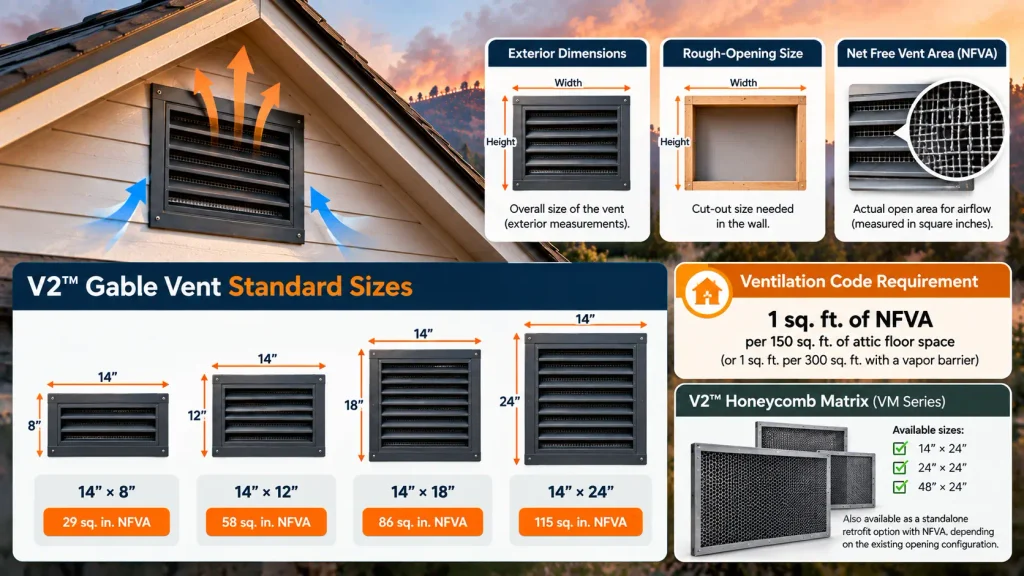
Gable vents come in a range of sizes, and choosing the right one requires understanding the difference between exterior vent dimensions, rough-opening (cut-out) dimensions, and net free vent area (NFVA).
Choosing the right vent size and ensuring correct installation-by understanding exterior dimensions, rough-opening sizes, and NFVA-is essential for homeowners and professionals committed to effective wildfire protection decisions.
NFVA is the actual open area through which air can pass, measured in square inches. Building code typically requires 1 square foot of NFVA per 150 square feet of attic floor space (or 1 square foot per 300 with a vapor barrier). A vent’s NFVA is determined by its design—louver angle, mesh density, and internal geometry all affect how much air actually moves through the opening. V2™ Gable Vents are available in three standard sizes across multiple flange styles:
- 14″ × 8″: 29 sq. in. NFVA
- 14″ × 12″: 58 sq. in. NFVA
- 14″ × 18″: 86 sq. in. NFVA
- 14″ × 24″: 115 sq. in. NFVA
Always confirm rough-opening dimensions and NFVA against your attic square footage and manufacturer specifications before purchasing. The V2™ Honeycomb Matrix (VM Series)—available in 14″ × 24″, 24″ × 24″, and 48″ × 24″ also comes as a standalone retrofit option with NFVA, depending on the existing opening configuration.
Common Gable Vent Styles
Louvered Gable Vents
The louvered gable vent is the most common residential design. Fixed or operable horizontal louvers direct airflow while providing some protection against wind-driven rain and snow. They add a traditional architectural element to the gable end, which is why gable vents are generally intended to show, unlike most other vent types.
Conventional louvered designs, however, offer no inherent ember resistance. The louver geometry helps with weather but does nothing to address fine ember fragments driven horizontally under wildfire wind pressure. In WUI zones, a louvered design without tested ember-resistant internal protection is an architectural feature that leaves the attic space exposed.
Metal Gable Vents
First and foremost, material selection matters significantly, especially when considering wildfire-prone areas. Aluminum and galvanized steel frames are durable, noncombustible, and corrosion-resistant under most conditions. In contrast, plastic and composite frames often degrade under UV exposure and fail under radiant heat, effectively eliminating their protective function in the conditions that matter most.
Galvanized steel is not ideal for installations within 5 miles of the ocean, where salt air accelerates corrosion. Stainless steel, copper, or powder-coated alternatives are the appropriate choice in coastal environments.
Why Gable Vents Need Ember Protection
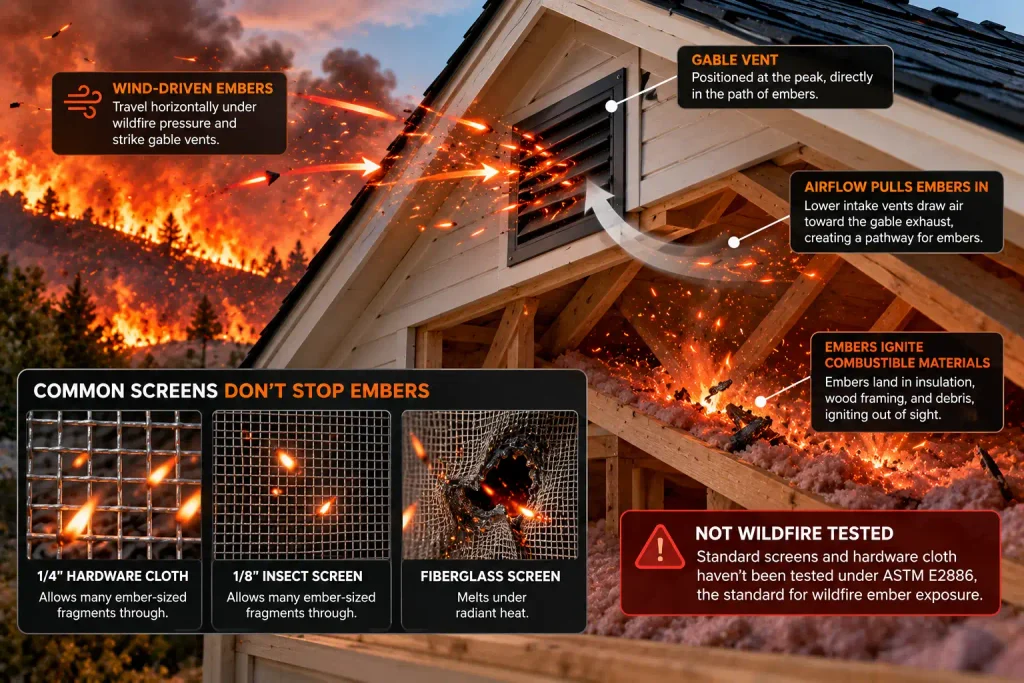
Gable vents are especially exposed during wildfires, and not just because of their size. Their position at the peak of the attic wall puts them directly in the path of wind-driven embers traveling horizontally under wildfire pressure. Add to that the natural air pull created by lower intake vents drawing air toward the gable exhaust, and you have an opening that embers are effectively being funneled toward.
Standard insect screens and hardware cloth weren’t designed with any of that in mind. They exist to keep pests out and handle basic weather, not to resist the sustained ember bombardment and radiant heat that a wildfire produces. Their mesh openings, typically 1/4″ or 1/8″, allow many ember-sized fragments through freely. Fiberglass screening melts. None of these materials have been tested under ASTM E2886, the standard that evaluates how a vent actually performs under simulated wildfire ember exposure, which is essential for verifying their protective effectiveness.
Once embers get through, they land in attic insulation, against wood framing, and in accumulated debris, materials that ignite readily in a hot, enclosed space. That ignition happens out of sight, which is part of what makes it so dangerous. Firestorm’s guide to how embers ignite homes walks through that sequence in full. Even the best ember-resistant vent needs periodic inspection—checking mesh integrity, sealant condition, and frame damage—to keep performing as designed.
What to Look for in an Ember-Resistant Gable Vent
To help homeowners understand safety benefits, including how wildfire-resistant vents prevent ember entry, reducing attic fire risk and protecting property, we built this guide for evaluating gable vents for wildfire-prone applications. Not all products marketed as “fire resistant” or “ember resistant” have been verified under actual wildfire test conditions, which means it’s important to look beyond label language at specific, verifiable performance criteria, such as:
- Fine metal mesh: 1/16″ stainless steel or finer, noncombustible, evaluated for ember blocking under ASTM E2886
- Heat-responsive protection: intumescent materials that activate under radiant heat to seal the vent opening when conditions escalate beyond ember exposure to flame contact
- Durable noncombustible construction: metal frames rated for exterior exposure, with appropriate material selection for the installation environment (stainless in coastal zones)
- Third-party testing and listing: ASTM E2886/E2886M/E2912 listing by an accredited certification body, not manufacturer self-certification
- WUI code compliance: ASTM E2886 listing satisfies California Chapter 7A’s listed vent compliance path for new construction and remodels in High and Very High Fire Hazard Severity Zones
V2™ Gable Vents for Wildfire-Prone Homes
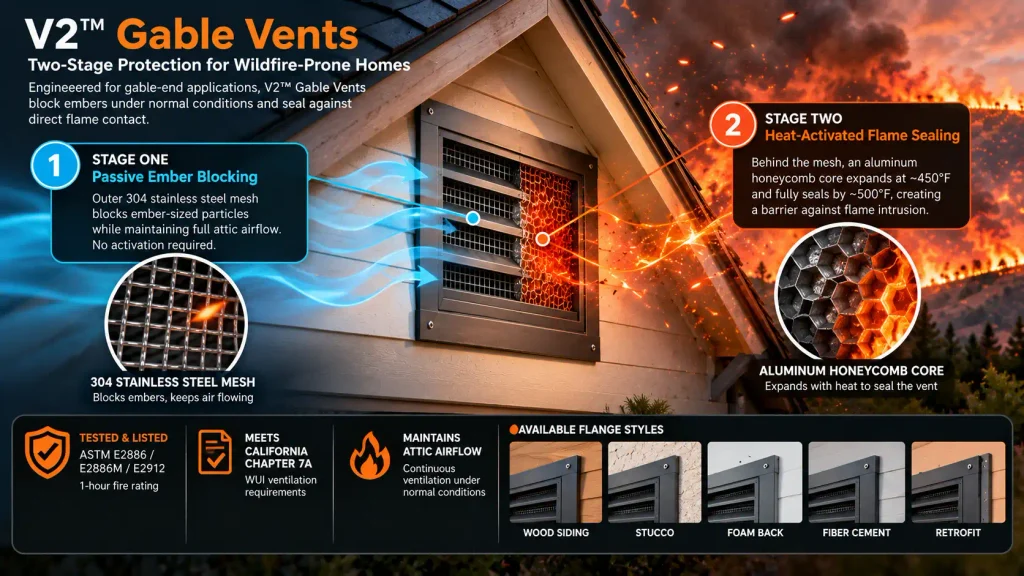
V2™ Gable Vents are built specifically for gable-end applications in wildfire-prone areas, engineered around a two-stage defense mechanism that handles both ember intrusion and direct flame contact, because those are two different threat levels that require two different responses.
Stage One: Passive Ember Blocking
The outer 304 stainless steel mesh works continuously under normal conditions, blocking ember-sized particles while maintaining full attic airflow. No activation required. No degradation under heat. It simply does its job from the moment it’s installed.
Stage Two: Heat-Activated Flame Sealing
Behind the stainless mesh is an aluminum honeycomb core—the same intumescent matrix used across the V2 product line—housed in a G90 galvanized steel frame. When radiant heat reaches ~450°F, that coating begins to expand. By around 500°F, the vent opening becomes fully sealed, creating a physical barrier against flame intrusion at the exact moment a home is under direct threat.
This is the distinction between passive screening and active wildfire defense. Standard mesh fills the opening. V2™ Gable Vents respond to escalating conditions. For the full technical explanation of how this mechanism works, see How V2 Vents Work.
V2™ Gable Vents are tested and listed to ASTM E2886/E2886M/E2912, carry a 1-hour fire rating, and are designed to meet California Chapter 7A WUI ventilation requirements. Full compliance documentation is available at V2™ Codes & Compliance. Flange styles are available for wood siding, stucco, foam back, fiber cement, and retrofit applications, covering both new construction and replacement projects on existing homes.
Choosing the Right Gable Vent For Your Home
Gable vents aren’t a one-size-fits-all purchase, and in a WUI-zone application, the wrong choice doesn’t just mean a return trip to the hardware store. It can mean a vent that doesn’t fit the opening, doesn’t meet code, or doesn’t actually perform under wildfire conditions.
Before you buy, work through these:
- Rough-opening dimensions: This is the cut-out size, not the exterior frame size. They’re different, and they vary by flange style. Measure your existing or planned opening and match it to the manufacturer’s rough-opening specs, not the overall vent dimensions.
- NFVA requirements: Calculate your attic square footage to make sure the vent’s net-free vent area meets your area’s building codes. A vent that looks right on the wall but underdelivers on airflow creates its own set of problems over time.
- Flange style: The right flange depends on your siding type and whether you’re working on new construction or retrofitting over existing material. Wood siding, stucco, foam back, and fiber cement each have a corresponding flange configuration, and getting this wrong affects both fit and water resistance.
- Material for your environment: Galvanized steel works well for most WUI applications, but it’s not the right choice for homes within 5 miles of the ocean. Salt air accelerates corrosion on galvanized products, so stainless steel, copper, or appropriately coated alternatives are the right choice for coastal installations.
- ASTM E2886 listing: Confirm the product is actually listed, not just described as ember resistant. Look for a listing number from an accredited third-party certification body. If you can’t find one, there isn’t one.
- Local WUI/code requirements: California Chapter 7A, the Colorado Wildfire Resiliency Code, and other state and local WUI codes may specify listing requirements for vent products in your jurisdiction. Confirm what applies to your project before you’re in front of an inspector.
Gable vents address the primary exhaust opening, but they’re not the only vulnerability on the structure. Secondary gaps like deck skirting, crawlspace perimeters, and fence connections don’t get covered by vent upgrades alone. EmberMesh™ is designed specifically for those in-between areas, closing the parts of the building envelope that a vent replacement project won’t reach.
Gable Vent Installation and Maintenance
Installation: Start by carefully measuring your rough opening. Use the manufacturer’s specifications, not the exterior vent dimensions, and do this before you cut anything. It may sound obvious, but it’s the step most people rush, and an off measurement means the vent won’t sit right no matter how well the rest of the installation goes. From there, be sure to follow the installation instructions specific to your flange style.
The process isn’t the same across the board—installing a flange-front vent into wood siding differs from a stucco or foam-back configuration, and a retrofit over an existing vent has its own steps. Apply intumescent fire caulking behind the nailing flange before you secure the vent to the wall. EverKem 814+ is what we recommend for most installations. That bead of caulking seals the perimeter where the vent frame meets your building material, and in a wildfire scenario, any gap there is a gap that embers can exploit.
Once the vent is in place, do final checks around the entire frame edge. If you can see daylight or feel airflow where the frame meets the wall, the job isn’t done.
Ongoing maintenance: Once the vent is installed, it doesn’t need much, but it does need a quick once-over before fire season every year. Make it part of your seasonal to-do list.
Start by clearing anything on the exterior that’s collected on the mesh surface, such as leaves, seed pods, pine needles, whatever’s accumulated since your last check. It’s easy to overlook because it doesn’t seem alarming, but debris sitting on a vent mesh is surface fuel sitting right at the opening. It also restricts airflow, which defeats the vent’s purpose in the first place.
While you’re there, take a close look at the mesh and frame for any signs of corrosion or physical damage. Some surface oxidation is normal over time, but pitting, rust streaking, or areas where the mesh has started to separate from the frame should be addressed so they don’t become (or allow) bigger problems to develop. This is especially important in humid climates or near the coast because those environments are harder on metal components.
Finally, take a look from inside the attic. Insulation has a way of migrating toward vent openings over time, and stored materials have a way of ending up where they shouldn’t. If something is blocking the interior airflow path, the vent can’t do its job no matter how well it’s installed on the outside. A clear path in, a clear path out—that’s all you’re confirming.
Gable Vents For Wildfire Protection
A gable vent does double duty in a wildfire-prone-area home: it provides the attic ventilation your structure requires and resists the ember entry that standard screening was never built to stop. V2™ Gable Vents are specifically built for this, tested under ASTM E2886, available across the flange styles needed for new construction and retrofit projects, and designed to maintain the airflow performance your attic requires while providing active two-stage protection when conditions escalate.
Gable vent protection is one component of a complete wildfire defense strategy. For the full picture of how vent upgrades, ember-resistant mesh, gutter protection, and defensible space work together as a system, explore V2™ Vents and Firestorm’s wildfire home hardening resources.

