

A well-ventilated attic is one of the most cost-effective ways to protect a home’s structure, extend roof life, and reduce energy costs. Gable vents are one of the most practical ways to create that ventilation, and installing one is a manageable project for experienced DIYers and a straightforward job for contractors and builders.
This guide walks through the complete installation process, from choosing the right location to sealing and inspecting the finished vent. It also covers when to choose ember-resistant gable vents—an increasingly important consideration for homeowners in wildfire-prone regions.
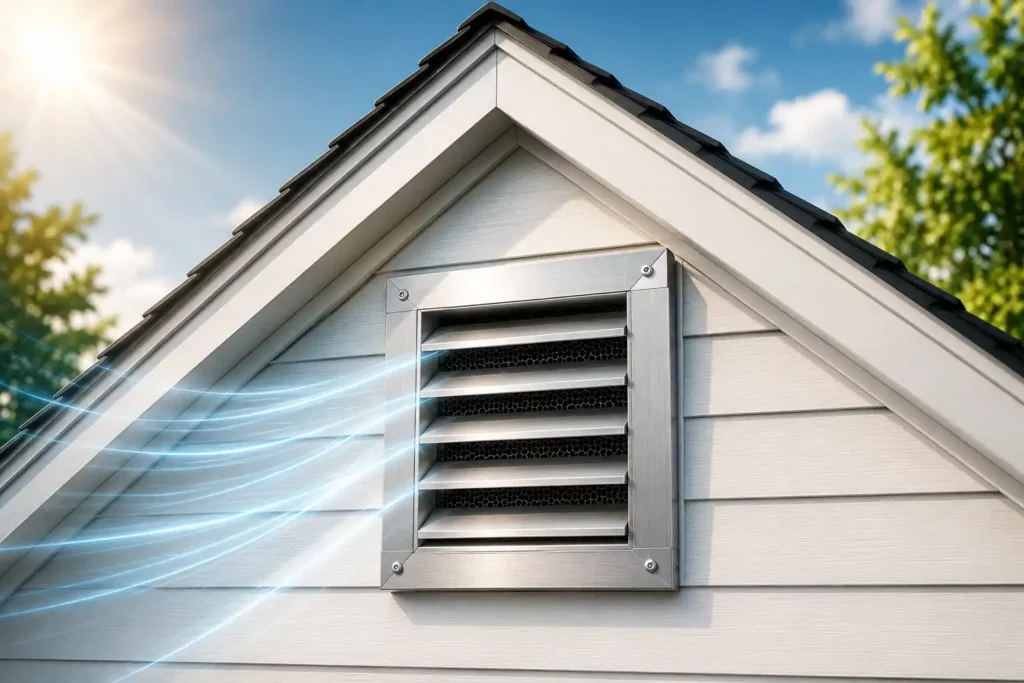
Why Proper Attic Ventilation Matters
Attics accumulate heat and moisture faster than almost any other space in a home. In summer, an unventilated attic can reach temperatures exceeding 150°F, and that heat radiates into living spaces below, forces HVAC systems to work harder, and degrades roofing materials from the underside. In winter and in humid climates, trapped moisture condenses on wood framing and roof decking, offering an ideal environment for mold, rot, and insulation failure.
Proper attic ventilation, including through gable vents, regulates temperature, manages moisture, extends roof lifespan, and reduces the energy load on heating and cooling systems. The U.S. Department of Energy recommends 1 square foot of net free vent area per 150 square feet of attic floor space as the baseline for adequate ventilation, which requires the right vent placement and the right product.
What Is a Gable Vent?
A gable vent is a ventilation opening installed in a home’s gable end wall—the triangular or peaked wall section at each end of a pitched roof, just below the roofline peak. Gable vents primarily serve as exhaust openings, allowing hot attic air to exit near the highest point of the attic space.
Unlike ridge vents, which run continuously along the roof peak, gable vents are discrete openings in the wall plane. Unlike soffit vents, which function primarily as intake at the eave, gable vents sit high on the structure where heat accumulates. When installed on opposing gable ends, they create a cross-ventilation effect that moves air through the full attic volume using wind pressure and natural convection, with no mechanical equipment required.
When Should You Install or Replace a Gable Vent?
Several situations call for gable vent installation or replacement:
- Damaged or deteriorated vents: cracked frames, corroded mesh, or missing screens create both ventilation and ember entry problems
- Poor attic airflow: signs include excessive ceiling heat, moisture staining on rafters, or higher-than-expected cooling costs
- Re-roofing or remodeling: the most cost-effective time to upgrade vents is when the area is already accessible
- Wildfire protection standard upgrades: standard vents in WUI zones should be replaced with ember-resistant alternatives; Chapter 7A compliance is required for new construction, and major remodels in California’s High and Very High Fire Hazard Severity Zones
- Older homes: original hardware cloth screens deteriorate over decades and may have mesh openings far too large for current code
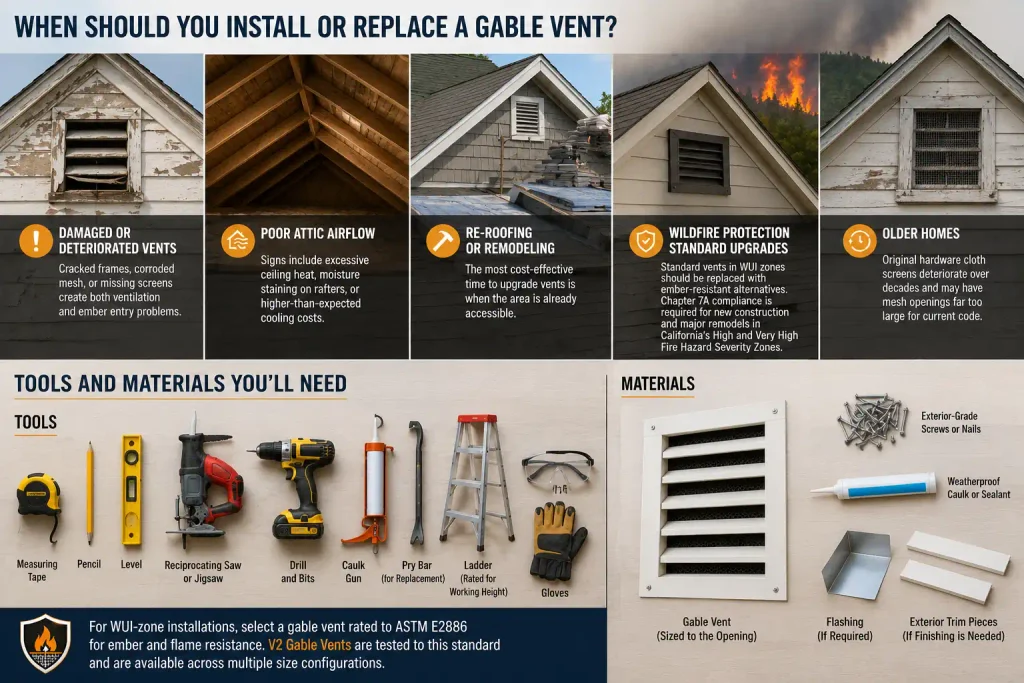
Tools and Materials You’ll Need
Tools:
- Measuring tape and pencil
- Level
- Reciprocating saw or jigsaw (for cutting the wall opening)
- Drill and bits
- Caulk gun
- Pry bar (for replacement work)
- Ladder rated for working height
- Safety glasses and gloves
Materials:
- Gable vent (sized to the opening)
- Exterior-grade screws or nails
- Weatherproof caulk or sealant
- Flashing (if required by local code or manufacturer)
- Exterior trim pieces (if finishing is needed)
For WUI-zone installations, select a gable vent rated to ASTM E2886 for ember and flame resistance. V2 Gable Vents are tested to this standard and are available across multiple size configurations.
Step-by-Step: How to Install a Gable Vent
Step 1: Choose the Installation Location
Gable vents should be installed as high on the gable end wall as structural framing allows, typically just below the roofline peak. For cross-ventilation, position vents on opposing gable ends at roughly the same height. Before marking, make sure nothing obstructs the intended location, such as wiring, blocking, or structural materials.
Step 2: Measure and Mark the Opening
From inside the attic, measure and mark the rough opening dimensions your vent manufacturer specifies, not the vent’s exterior frame dimensions. Use a level to confirm your marks are square and plumb. Drill a pilot hole at each corner of the marked opening to establish your cut boundaries before moving to the exterior.
Step 3: Cut the Opening Safely
From the exterior, connect the pilot holes with a chalk line and cut the opening with a reciprocating saw or jigsaw. Cut only through the sheathing and siding, stopping well short of any framing members. Have someone (a partner or helper) support the section from inside the attic as you complete the cut to prevent it from falling inward. Remove any insulation that has migrated into the opening area.
Step 4: Install and Secure the Vent
Test-fit the vent in the opening before applying any sealant. The vent flange should sit flush against the exterior wall surface with consistent contact around the full perimeter. Once fit is confirmed, apply a bead of weatherproof caulk to the back of the flange, position the vent, and secure with exterior-grade screws or nails at the spacing specified in the manufacturer’s instructions. Do not over-drive fasteners. The flange should be firmly seated, not compressed or warped.
Step 5: Seal Around the Vent
Apply a continuous bead of exterior-grade caulk around the full perimeter of the vent flange, tooling it into any gap between the flange and wall surface. For installations where flashing is required, particularly below the vent on siding types prone to water infiltration, install flashing before applying final caulk. Allow sealant to cure fully before painting or finishing.
Step 6: Finish Exterior Trim and Inspect
Install any exterior trim pieces required by the vent design or local code. From inside the attic, confirm the vent opening is clear, the mesh is undamaged and properly seated, and no framing debris has been left in the path of airflow. Check from the exterior that the vent sits flush, caulk coverage is complete, and no gaps are visible at the frame edge.
Common Gable Vent Installation Mistakes
- Undersizing the vent: A vent that’s too small for the attic square footage doesn’t move enough air. Calculate net free vent area requirements before selecting a product.
- Poor sealing at the flange perimeter: Gaps between the flange and wall surface allow water infiltration and, in fire-prone areas, ember entry around the frame edge. Continuous caulk coverage with no gaps is non-negotiable.
- Incorrect rough opening dimensions: Cutting the opening to the vent’s exterior frame size rather than the specified rough opening results in a vent that won’t fit correctly. Always use manufacturer rough opening specs.
- Skipping flashing where required: On certain siding types and in high-moisture climates, flashing below the vent is required to prevent water from migrating behind the siding. Confirm local requirements before skipping this step.
- Ignoring local codes: In California’s WUI zones, Chapter 7A requires ember-resistant vents that meet specific material and listing requirements. Installing a standard vent in a WUI zone may fail inspection and require replacement, costing significantly more than specifying correctly from the start.
- Blocking attic airflow: A gable vent installed too close to insulation baffles, blocking, or stored materials in the attic space won’t ventilate effectively. Keep the interior airflow path clear.
Why Ember-Resistant Gable Vents Are Important
In wildfire-prone communities, a gable vent’s position on the structure contributes to its vulnerability. Gable vents sit high on exterior walls, directly in the path of wind-driven embers that travel horizontally under wildfire pressure. Standard vent screens, including common 1/4″ and 1/8″ hardware cloth, were not designed for that kind of exposure; their mesh openings allow ember-sized fragments through, and fiberglass screening can melt or ignite under radiant heat.
Once embers enter a gable vent, they reach attic insulation, wood framing, and accumulated debris, all materials that ignite readily in an enclosed space. Attic ignition can develop and spread before it becomes visible from the exterior, which is why addressing the entry point matters more than responding after the fact.
For a detailed breakdown of how V2 Vents work against ember and flame intrusion, including the two-stage passive and active defense mechanism, our technical overview covers the engineering in full.
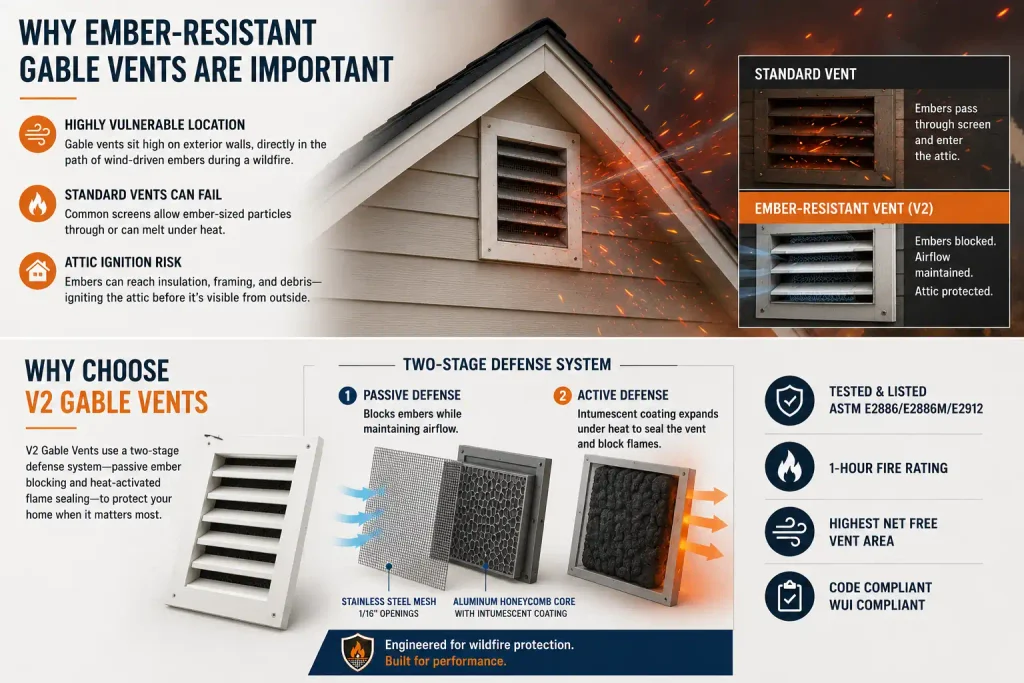
Why Choose V2 Gable Vents
V2 Gable Vents address the standard vent failure modes through engineered design rather than material substitution alone.
The outer stainless steel mesh, at 1/16″ openings, blocks ember-sized particles while maintaining full airflow. Behind the mesh, an aluminum honeycomb core coated in intumescent material provides a second layer of defense: when exposed to radiant heat, the intumescent coating expands and fully seals the vent opening, creating an active thermal barrier during direct wildfire exposure. This two-stage system—passive ember blocking plus heat-activated flame sealing—distinguishes V2 Vents from mesh-only alternatives.
V2 Vents are tested and listed to ASTM E2886/E2886M/E2912, carry a 1-hour fire rating, and are engineered for the highest net free vent area on the market, meaning they deliver more airflow per vent, not less. Full compliance documentation is available at V2 Vents codes and compliance.
Maintenance Tips After Installation
A properly installed gable vent requires minimal maintenance, but annual inspection keeps it performing as intended:
- Inspect mesh condition: look for corrosion, physical damage, or gaps at the frame edge that weren’t present at installation
- Clear debris from the mesh surface: leaves, seed pods, and accumulated dirt reduce airflow and, in fire-prone areas, create surface fuel
- Check caulk and sealant: exterior caulk degrades over time; reapply where cracking or separation is visible to maintain water and ember exclusion
- Confirm interior airflow path is clear: insulation, stored materials, or pest intrusion can block attic airflow without affecting the vent’s exterior appearance
- Schedule before fire season: catching corrosion or mesh damage before fire season is significantly preferable to discovering it during one
Proper Gable Vent Installation Protects Your Home
Proper attic ventilation protects a home’s structure, controls energy costs, and in wildfire-prone areas, directly affects fire survivability. A correctly installed gable vent—sized to the opening, sealed thoroughly, and chosen for the conditions it will face—delivers all three benefits.
In WUI zones, the product specification matters as much as the installation. V2 Gable Vents deliver tested ember and flame resistance alongside the highest net free vent area on the market, giving your home the ventilation performance your attic needs and the wildfire protection your location requires.
For product guidance, sizing questions, or project-specific recommendations, contact Firestorm Building Products directly.
Frequently Asked Questions
Can I install a gable vent myself?
Homeowners with basic carpentry experience and appropriate tools can easily complete this project. The most critical steps are accurate measurement, a clean cut, and thorough sealing. In WUI zones where ember-resistant vents are required, be sure to confirm product specifications before purchasing.
Where should a gable vent be installed?
As high as possible on the gable end wall, just below the roofline peak, where heat accumulation is greatest. Position opposing gable vents at roughly the same height to support cross-ventilation.
How many gable vents does a house need?
Enough to achieve the net free vent area required by code, typically 1 square foot of NFVA per 150 square feet of attic floor space (1:300 with a vapor barrier). Calculate your attic square footage and match it to the NFVA specifications of the vents you select.
Do gable vents improve attic ventilation?
Yes, when properly sized and positioned, gable vents effectively exhaust hot attic air and support cross-ventilation with intake vents below. They’re particularly effective on homes with pronounced gable ends.
Are ember-resistant gable vents worth it in wildfire-prone areas?
Gable vents sit at one of the highest-risk ember entry points on a home. The cost of upgrading to a listed, ember-resistant vent is a fraction of the cost of attic ignition and structural repair from fire damage. In California and Colorado WUI zones, ember-resistant vents are a code requirement for new construction and major remodels.
Do gable vents meet California Chapter 7A requirements?
Standard gable vents do not. Chapter 7A requires listed ember- and flame-resistant vents for WUI construction. V2 Gable Vents are tested and listed to ASTM E2886/E2886M/E2912 and satisfy Chapter 7A requirements. Compliance documentation is available at V2 Vents codes and compliance.
Should I hire a professional for gable vent installation?
For straightforward replacements on accessible gable ends, experienced DIYers can handle the installation. For new openings being cut into finished walls, complex rooflines, or WUI-zone projects where code compliance requires documentation, a licensed contractor is the better choice.

