

California’s Legislature made it official this year: home hardening now has its own dedicated week. Assembly Resolution 136, adopted August 17, 2026, designates the second week of September, and every second week of September after that, as Home Hardening Week in California. The resolution recognizes home hardening as one of the most effective tools available to protect homes and reduce insurance costs in a state where wildfire risk is no longer seasonal.
If you didn’t use Home Hardening Week to inspect your home, that’s fine; the work is still worth doing. And one of the highest-return places to start takes about five minutes. This guide walks through a quick visual vent check any homeowner can do, explains what to look for, and outlines what to do when you find something worth addressing.
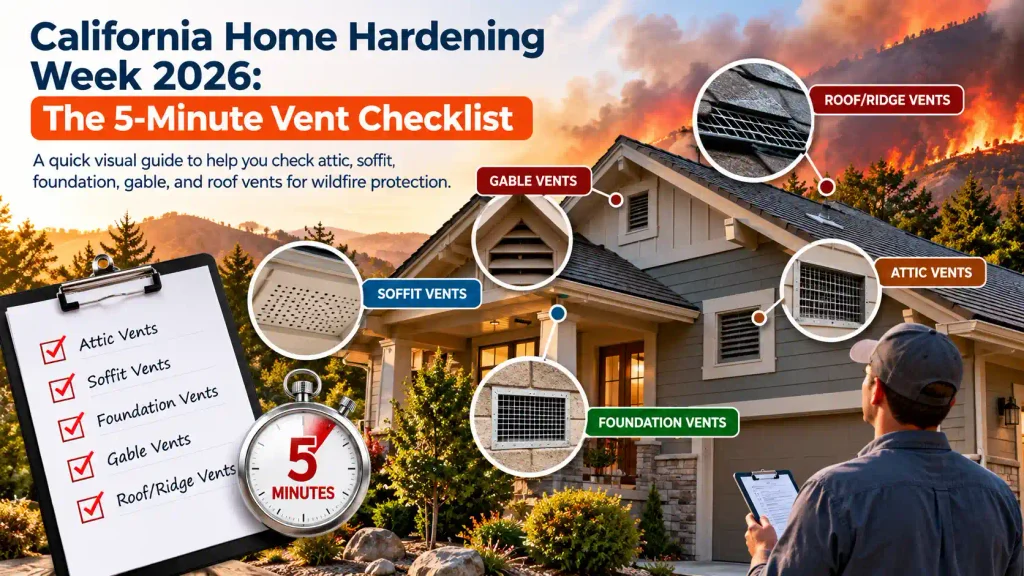
Why Vents Matter for Wildfire Home Hardening
Home hardening reduces a structure’s vulnerability to ignition by using fire-resistant materials, sealing gaps, and addressing the specific entry points embers exploit during wildfire events. It’s not about eliminating ventilation. It’s about making sure the openings your home needs to breathe aren’t also the openings a wildfire uses to get inside.
Vents are one of the most consistently overlooked vulnerabilities in that equation. Attic vents, soffit vents, foundation vents, gable vents, and roof vents are all designed to move air, and under wildfire conditions, they move embers just as efficiently. Standard insect screens and hardware cloth were never engineered for this. They handle pest exclusion. They don’t handle the combination of ember pressure, radiant heat, and sustained wind that a wildfire produces.
The five-minute check below won’t replace a professional inspection, and it won’t tell you everything. It will help you spot obvious problems worth investigating further: damaged screening, large openings, gaps at the frame, and vent protection that clearly wasn’t designed for wildfire exposure.
The 5-Minute Vent Checklist
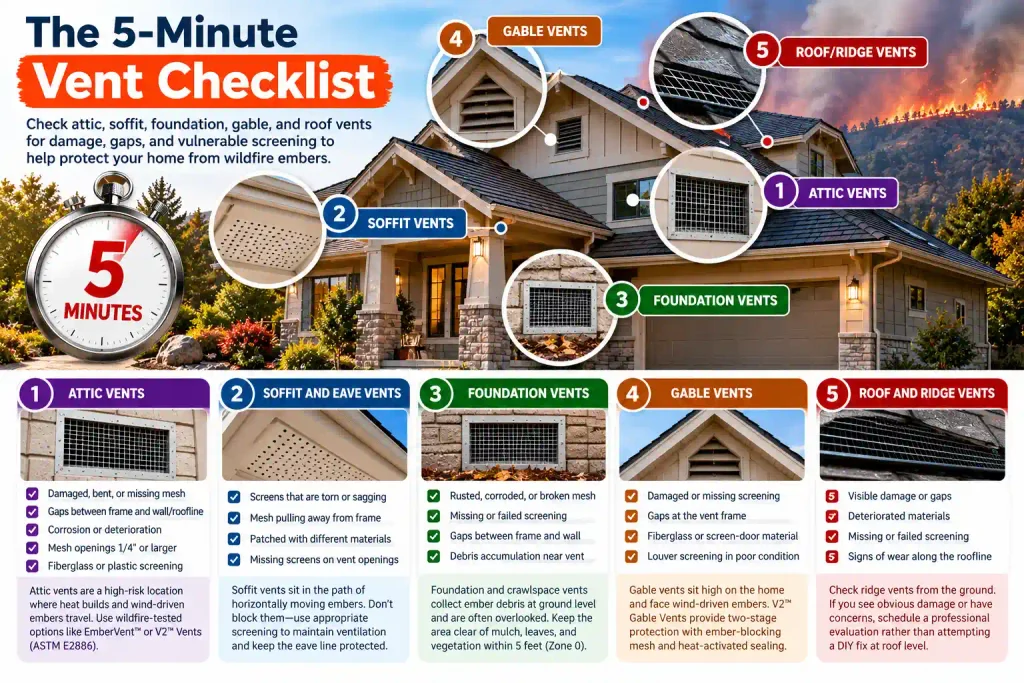
1. Check Your Attic Vents
Attic vents sit in one of the home’s highest-risk locations, where heat accumulates and wind-driven embers travel. Walk the exterior and look up at any visible attic vent locations. You’re checking for:
- Damaged, bent, or missing mesh or screening
- Visible gaps between the vent frame and the wall or roofline
- Corrosion or physical deterioration of the vent material
- Mesh openings that look large enough to pass a pencil tip through (1/4″ or larger openings are common on older homes and don’t meet current WUI standards)
- Signs that screening is fiberglass or plastic rather than metal
EmberVent™ and V2™ Vents are engineered specifically for attic vent protection in wildfire-prone areas, tested and listed to ASTM E2886, not just marketed as fire resistant.
2. Check Soffit and Eave Vents
Soffits run along the underside of the roof overhang, and their vents sit directly in the path of embers sweeping horizontally under wind pressure. Look along the eave line from ground level and check for:
- Screens that are torn, sagging, or pulling away from the frame
- Areas where mesh has been patched with different materials
- Missing screens on individual vent openings
Don’t block soffit vents to address this; they’re part of your attic’s ventilation system, and eliminating them creates moisture and heat problems. The fix is appropriate screening, not sealing. Keep this check brief; Firestorm’s Complete Guide to Soffit Vent Screens for Wildfire Protection covers this location in full detail.
3. Check Foundation and Crawlspace Vents
Walk the full perimeter of your home at ground level and look at every foundation vent. These low-profile openings accumulate ember debris at ground level and are often the most neglected vent location on the property. Check for:
- Rusted, corroded, or broken mesh
- Openings where screening has failed completely
- Gaps between the vent frame and the foundation wall
- Visible debris accumulation against or near the vent face
Ground-level ember accumulation is more significant than most homeowners expect. If you have wood mulch, dry leaves, or vegetation within the five-foot Zone 0 perimeter adjacent to a foundation vent, that’s an additional concern worth addressing alongside the vent itself.
4. Check Gable Vents
Gable vents sit high on the triangular end wall of the attic visible from the street and in a direct line of fire for wind-driven embers. From ground level, look for:
- Damaged or missing louver screening
- Gaps at the vent frame perimeter
- Signs of the screening material: metal mesh is in good condition, versus fiberglass or screen-door type material that shows age or damage
V2™ Gable Vents are the engineered replacement option here: two-stage protection with passive ember-blocking mesh and heat-activated intumescent sealing.
5. Check Roof and Ridge Vents
For this five-minute check, stay on the ground. You can often get a reasonable view of ridge vent condition from the yard; look for obvious damage, gaps, or deteriorated materials along the roofline peak. Don’t climb onto the roof for a quick visual inspection.
Ridge vents typically require a more specialized evaluation than the other vent types on this list. If you see obvious damage or have concerns, flag it for a professional evaluation rather than attempting a DIY fix at roof level.
What Should You Look for During the 5-Minute Check?
Here’s the complete list in one place:
- Damaged or torn screening
- Missing screening on any vent opening
- Large mesh openings (1/4″ or bigger, visible at a glance)
- Fiberglass or plastic mesh that may melt under heat
- Corrosion or rust on the vent frame or mesh
- Loose or poorly fitted screens with gaps at the perimeter
- Gaps between the vent frame and the wall or roofline
- Debris accumulated on or against the vent face
- Visible deterioration suggesting the vent hasn’t been inspected in years
Simple takeaway: If a vent looks damaged, deteriorated, poorly protected, or simply like it was installed without wildfire exposure in mind, mark it for further evaluation. Don’t assume that a screen means the vent is adequately protected.
What If You Find a Problem With Your Vent?
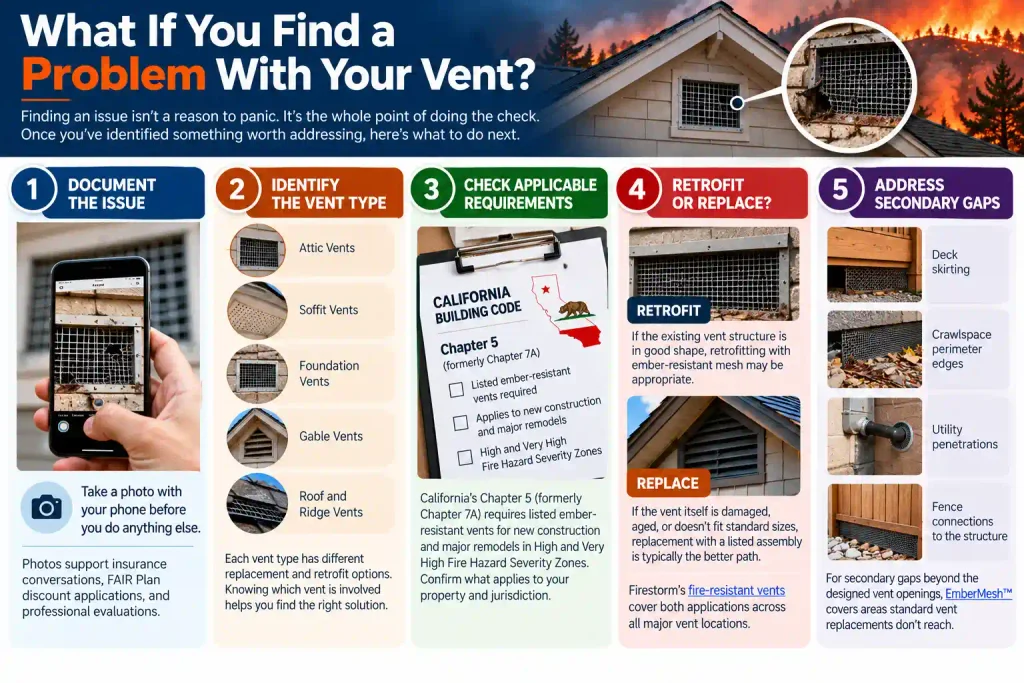
Finding an issue isn’t a reason to panic. It’s the whole point of doing the check. Once you’ve identified something worth addressing:
Document it. Take a photo with your phone before you do anything else. Photos support insurance conversations, FAIR Plan discount applications, and professional evaluations.
Identify the vent type. Attic, soffit, gable, foundation, and ridge vents each have different replacement and retrofit options. Knowing which vent is involved helps you find the right solution.
Check applicable requirements. California’s Chapter 5 (formerly Chapter 7A) requires listed ember-resistant vents for new construction and major remodels in High and Very High Fire Hazard Severity Zones. Confirm what applies to your property and jurisdiction.
Retrofit or replace? If the existing vent structure is in good shape, retrofitting with ember-resistant mesh may be appropriate. If the vent itself is damaged, aged, or doesn’t fit standard sizes, replacement with a listed assembly is typically the better path. Firestorm’s fire-resistant vents cover both applications across all major vent locations.
For secondary gaps beyond the designed vent openings—deck skirting, crawlspace perimeter edges, utility penetrations—EmberMesh™ covers areas standard vent replacements don’t reach.
When Should You Upgrade to Ember-Resistant Vent Protection?
An upgrade deserves consideration when:
- The existing screen is visibly damaged, corroded, or deteriorated
- The mesh opening is larger than 1/8″ or especially 1/4″ or larger
- The screening material is fiberglass or plastic
- Your home is in a wildfire-prone or WUI area with any vent protection that hasn’t been evaluated for wildfire exposure
- You’re undertaking broader home hardening improvements and want the vent work done at the same time
- You’re replacing or remodeling and want to meet current code rather than inherit an older specification
- The vent location has characteristics—position, size, or exposure—that make it particularly vulnerable
One thing to be clear about: upgrading vents improves protection and may help with FAIR Plan wildfire hardening discount eligibility, but no single improvement guarantees code compliance or a premium reduction. Verify applicable requirements with a qualified inspector or your insurance broker before assuming a specific outcome.
How This 5-Minute Check Fits Into a Larger Home Hardening Plan
A vent inspection is a starting point, not a complete home hardening assessment. CAL FIRE’s home-hardening guidance covers the full building envelope: roofs, eaves, windows, decks, gutters, and Zone 0 clearance alongside vent protection as part of a comprehensive wildfire resilience approach.
Other areas worth adding to your list after the vent check:
- Gutters: debris accumulation creates roofline fuel beds; FireStorm® Gutter Guards eliminate that accumulation
- Deck Perimeter: gaps under deck skirting are ember entry points that vents don’t address
- Zone 0: combustible mulch, vegetation, and stored materials within five feet of the structure
- Roofing Material: Class A fire-rated covering is a FAIR Plan discount-qualifying measure
Make Home Hardening Part of Your Wildfire Preparation
California Home Hardening Week put a name on something homeowners in WUI communities have needed for years: a designated moment to stop, look at the building, and ask whether it’s actually prepared for what wildfire season brings.
The honest answer for most homes is that at least one vent hasn’t been evaluated, one screen is overdue for replacement, or one gap shouldn’t be there. The five-minute check finds those. From there, the path forward is straightforward:
Inspect → Identify → Prioritize → Upgrade → Maintain
Vents are the right place to start because they’re accessible, easy to evaluate in minutes, and directly connected to one of the most common ignition pathways in wildfire-related home loss. Everything else you do after that builds on a foundation that’s actually protected.
Start With Five Minutes
You don’t need to inspect the entire house at once. Walk the exterior, look at the vents, and note anything that looks damaged, deteriorated, or questionable. Take photos. That’s the whole task.
If you find something, and there’s a reasonable chance you will, Firestorm’s V2™ Vents and fire-resistant vents are the place to start for solutions. If your inspection turns up questions about the right approach for your home’s specific configuration, that’s a good reason to get a professional evaluation before fire season rather than after.

